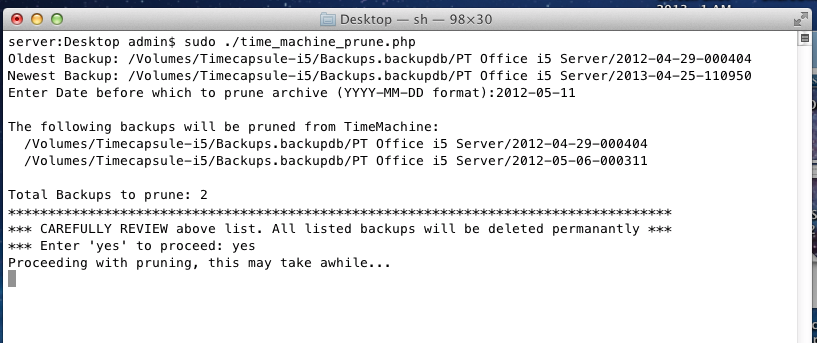
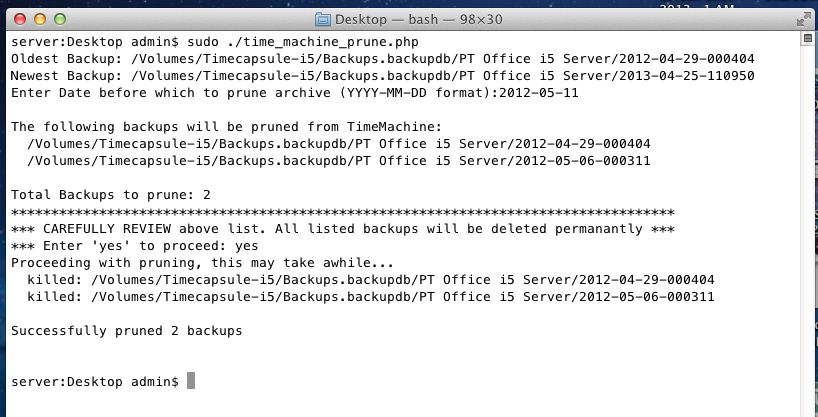
We’re going assume you’re using NameCheap to host your DNS records in addition to being the register for your FQDN (fully qualified domain name). Additionally that the Synology NAS is on the same network that is hosting your domains. The domains don’t need to be hosted on the Synology NAS, but they all have to share the same connection to the internet.
Go to Domain List on the NameCheap site and navigate to your domain. Click the ‘Manage’ button , then go to the ‘Advanced DNS’ tab. Scroll to the bottom and turn on ‘Dynamic DNS’. This will show you a Dynamic DNS Password like 7a0354e9ae547b9d30ab0ea4ff0a30f7. You will need this when setting up the Synology part of this process. (The password show in the image below is not valid and was reset after I took the screen shot.)

This API password string will be different for each domain you have on NameCheap. Thus if you have 5 different domains that all need dynamic DNS, you’ll end up with 5 different Dynamic DNS Passwords.
Add a new ‘A + Dynamic DNS Record’
While still on the Advanced DNS NameCheap page. Scroll down your DNS records and then click the ‘Add New Record’ button and select ‘A + Dynamic DNS Record’

Fill in the record. Use ‘@’ as the host and 127.0.0.1 as the IP address. This will get updated to your current IP address by Synology the first time it connects. For now, leave your existing ‘A’ record.

Click the ‘check’ mark to save the record. I usually set to ‘5 minutes’ rather than Automatic so that changes to your IP address are reflected more quickly in the DNS record. I believe ‘Automatic’ is 30-minutes. It’s my understanding that if left to 30-minutes, once your IP address changes and Synology informs NameCheap of the change, it would take 30+ minutes to update the DNS record. This is why I’ve set it to 5 minutes instead.
Setting up update mechanism on Synology NAS
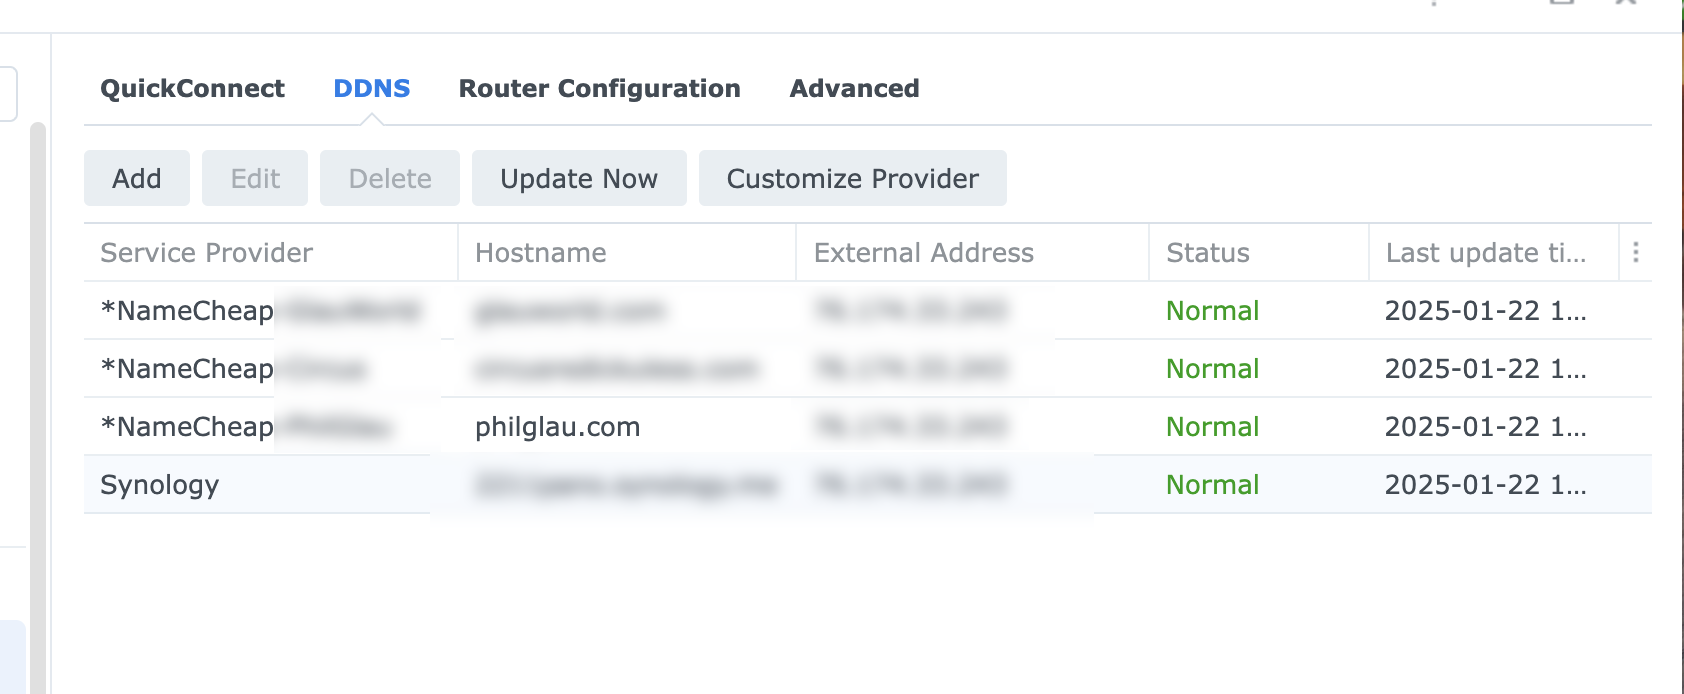
Log into your Synology NAS and navigate to Control Panel=> External Access => ‘DDNS’ tab. If you’ve not set up and DDNS records before, this will be blank. In my case I have 3 dynamic records set up already with NameCheap and one with Synology directly. (The Synology one is not there by default either, I manually set that one up too. Not relevant to this post.)
Click ‘Customize Provider’. This will bring up a modal screen where you can enter the information about your domain on NameCheap.
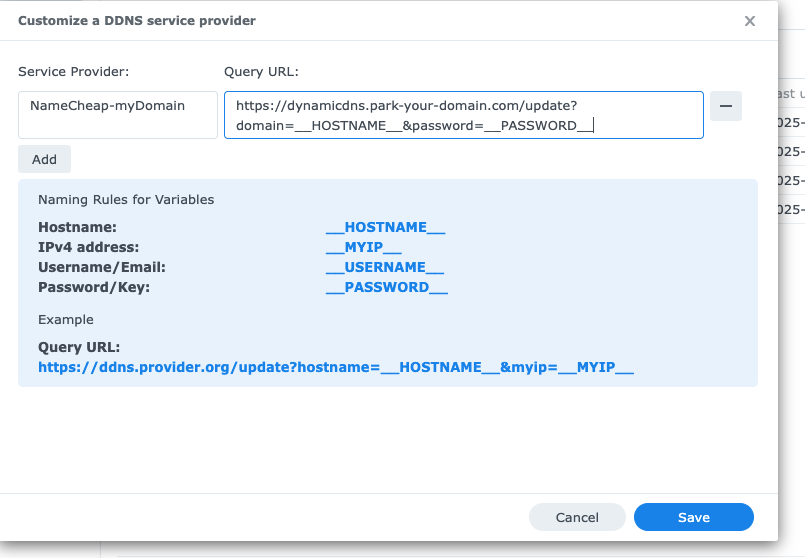
You can enter anything you want in the ‘Service Provider’ field, but I’ve adopted a nomenclature where I put ‘NameCheap-‘ followed by my domain name.
For the Query URL use:
https://dynamicdns.park-your-domain.com/update?domain=__HOSTNAME__&password=__PASSWORD__
This is the string that Synology will use to connect to NameCheap. __HOSTNAME__ and __PASSWORD_ will be configured in the next step.
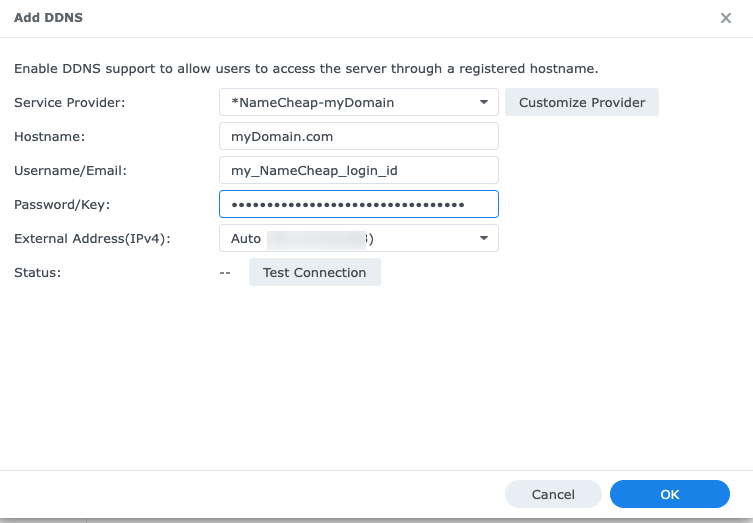
Click Save to return back to the DDNS page. Now click the ‘Add’ button. From the ‘Service Provider’ pull-down menu select the newly created record. In this case it was ‘NameCheap-myDomain’. Enter the FQDN for the Hostname. For ‘Username’, you can put your NameCheap login, but I don’t think this is strictly necessary as it uses only the API password for authentication.
In the Password/Key field put the long API password NameCheap provided above. It will be a long string similar to 7a0354e9ae547b9d30ab0ea4ff0a30f7.
It doesn’t seem like the ‘Test Connection’ actually tests the validity of the API password. I get ‘Pass’ even if I put in the wrong password. I suspect it’s only testing that it can reach the URL in question, not that it has successfully logged in.
Click the OK button to return to the DDNS page.
When you return to the DDNS page you should see your newly created DDNS record.
Click ‘Update Now’ to test the connection. This should reach out to NameCheap and provide the new IP addresses. Assuming you set the time to ‘5-minute’ above, it might take upwards of 5-minutes for the changes to populate in the DNS record. I’ve seen it say ‘Fail’ when I’ve hit the button, but upon ‘re-hitting’ it again, it usually indicates that the Status is ‘normal’. I think if you see ‘Fail’ consistently or the record doesn’t propagate to NameCheap, then you may have entered the query string incorrectly or the API password.
Monitoring Changes
On the NameCheap site, if you go back to the Advance DNS and see that the ‘A + Dynamic’ record is no longer 127.0.0.1 and instead your IP address, that means it worked. You can probably remove your fixed ‘A’ record and now just rely on the A+ Dynamic record.
I have multiple domains, what do I do?
Each DDNS record handles only one NameCheap domain name. This is because each domain will have its own API password. You just need to add new Custom Providers, one for each domain. Everything stays the same except the password for each domain. This is why I used ‘NameCheap-XXXXX’ as my service provider, so I can easily identify which domain belongs to which DDNS record.
Going forward – changes in IP address
Now, if you IP address changes, the Synology NAS will detect the change and transmit the update to NameCheap.
Personally I have found that my IP address is pretty stable with my provider. It seems to change if I do something major like change my cable modem or there’s a significant power outage that cause their systems to reset. (I think if the powers out for X amount of time at my place, my provider ‘releases’ the IP address back to their pool. Once power comes back on, they issue me a new IP address.)
Updating other DNS records like SPF
If you have any records in your DNS that previously relied on a fixed IP address you will need to adjust them to work essentially point to the active ‘A’ record.
For example if you have a SPF record which previously pointed to your manually set IP address like:
v=spf1 ip4:111.222.333.44 ~all
You would need to update it to:
v=spf1 a:myDomain.com ~all
Assuming your A record ‘@’ points to ‘myDomain.com’. Double check your other DNS records to see if a previous fixed IP address needs to be removed and pointed to the dynamic A record.